Network Drops and Cabling
Contents
Buildout Plan
Okay, here's what we're doing.
- Buy all necessary equipment
- Place all cables 105" (8.75') in the air - this is high enough to clear our loft; and definitely high enough to be out of the way. Hopefully, it's also not so high we can't work on it as need be.
- TODO: See how tall the hangers end up being - we'll want the bottom of them to be at the 105" line; and the actual mount higher than that.
- Place laser level up to draw a line, or use a chalk line to put one on the wall.
- Install all hangers. TIA standards apparently say every 4-5 feet; which should work. Will probably want to double up at drop points.
- Pull cable from demarc to drop.
- Place cable in hanger
- Punch down cable in patch panel and drop
- Rinse, repeat.
Order of drops
My calculations come up that we should be safe with a single 500' pull box, but it's entirely possible we'll come up short. In the interest of reserving funds, I'm opting not to buy the second pull box until we need it.
We will pull in this order:
- 3D printer room
- South wall
- Front door
- North wall
- Woodworking room
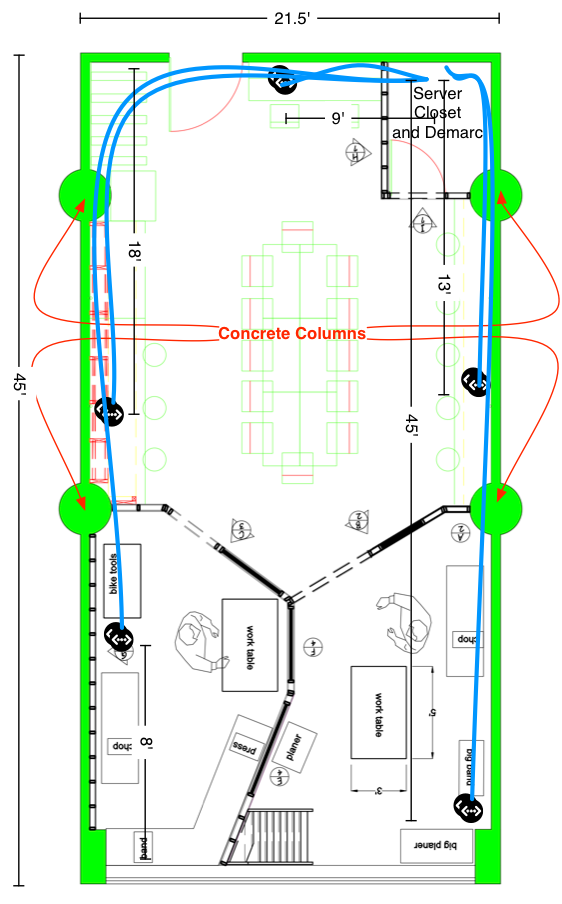
Proposed layout
I'd like to get at least two physical drops in every interesting place. Our network backbone and internet link are both pretty narrow (by 2014 standards), which means that it's unlikely we'll see a bottleneck be a small switch attached to a drop point if we need more than the two available.
Limitations of network drops
We have some challenges to overcome when doing these drops.
- Concrete Columns - These columns are wide, and concrete. We can't drill through them to put cables in them, nor easily attach things to them. They're also floor-to-ceiling, so there's no good way around them
- Ceiling - The ceiling, is concrete and 16' up. It's not likely a good place to attach cables.
- Cable visibility - There's no way around this - we're going to see cabling.
Needed equipment
Some way to attach the cable to the wall. Options are:
- http://www.discount-low-voltage.com/Cable-Management/J-Hooks/ERICO-CAT12 Erico J-hooks
- http://www.amazon.com/Arlington-TL20-100-Hangers-Communications-100-Pack/dp/B00422M2CG Arlington The Loop hooks (though I'm not sure how these work - I'd like to get an eval item)
- http://www.amazon.com/Platinum-Tools-JH802-100-Bridle-Ring/dp/B00HWYB5WE/ref=sr_1_5?ie=UTF8&qid=1394383188&sr=8-5&keywords=bridle+ring Bridle rings are also an option, but we'd have to get ones specifically for high-speed cable, fashion some force-spreader of some sort, or run them very close to each other - they're notorious for causing kinking in CAT5/6 cabling and failure. They've been historically used in these sort of applications, though.
Also:
- Wall jacks/surface-mount junction box ( http://www.amazon.com/gp/product/B0072JVTMA?gclid=CMKG9Kuvhr0CFecWMgodoXAA_w, http://www.amazon.com/gp/product/B0072JVTMA?gclid=CMKG9Kuvhr0CFecWMgodoXAA_w )
- Keystone jacks (http://www.amazon.com/gp/product/B0072JVTMA?gclid=CMKG9Kuvhr0CFecWMgodoXAA_w)
- Probably another pullbox (still need to do measurements)
- Punchdown tool (http://www.amazon.com/DataShark-70034-Non-Impact-Punchdown-Tool/dp/B000KMFDZ0/ref=sr_1_1?ie=UTF8&qid=1394399742&sr=8-1&keywords=cat6+punchdown+tool , I think we have one)
- CAT6 rated Patch panel ( http://www.amazon.com/Monoprice-107253-24-Port-Patch-Compatible/dp/B0069MHLCS/ref=sr_1_5?ie=UTF8&qid=1394399761&sr=8-5&keywords=24+port+patch+panel )
Drops
Table 'o network drops, and length between server room and drop.
| Room | Number of drops | Length from server room to drop (feet) | Elevation required per drop | Total cable required (feet) |
|---|---|---|---|---|
| Front door | 2 | 9 | 9 | 36 |
| North wall (whiteboards) | 2 | 13 | 9 | 44 |
| Woodshop room | 2 | 45 | 9 | 108 |
| 3D Printer/Laser Cutter Room | 2 | 58.5 | 9 | 135 |
| South wall (lockers) | 2 | 39.5 | 9 | 97 |
| Total: | 420 |
To Buy
| Item | URL | Cost | Qty | Total |
|---|---|---|---|---|
| Network cable hangers | http://www.amazon.com/Arlington-TL20-100-Hangers-Communications-100-Pack/dp/B00422M2CG | 49.92 | 1 | 49.92 |
| Patch panel (12 port) | http://www.monoprice.com/Product?c_id=105&cp_id=10514&cs_id=1051401&p_id=7252&seq=1&format=2 | 17.62 | 1 | 17.62 |
| Surface mount wall-boxes | http://www.monoprice.com/Product?c_id=105&cp_id=10517&cs_id=1051705&p_id=7089&seq=1&format=2 | 0.57 | 10 | 5.7 |
| Keystone jacks | http://www.monoprice.com/Product?c_id=105&cp_id=10513&cs_id=1051309&p_id=5379&seq=1&format=2 | 1.51 | 10 | 15.1 |
| #10 Washers (50) | http://www.homedepot.com/p/Everbilt-10-Stainless-Steel-Flat-Washer-50-Pieces-32482/100337712 | 2 | 2.36 | 4.72 |
| #10 screws (100) | http://www.homedepot.com/p/Everbilt-10-x-1-in-Zinc-Plated-Pan-Head-Phillips-Drive-Sheet-Metal-Screw-100-Pieces-24922/202102346?N=5yc1vZc2b0Z1z0y8pv | 1 | 5 | 5 |
| Grand total | 98.06 |
Also, a laser level on a tripod, if we can loan/rent one from somewhere, is going to be very helpful to make sure these cables are hung level.
